

1.. Login to OCI cloud account, click on the Tab Developer Service and under the Tab Application Integration click on Tab Integration

2. Select required compartment appropriately and click on the Tab Create and then enter details as follows and at the end click on tab Create.

3. Once OIC instance is created, click on the created Instance for detail page.

3.1 Detail page for the OIC Instance

4.. To logging into OCI console, click on the Tab service consol. Once OCI console page is opened then navigate to left navigation pane and click Home > Integrations > Connections.

4.1. In Top right click on Tab Create and search for ATP connection adapter as follows and click on the Tab select

4.2 Enter the detail as follows

5. Once connection is created, Click on the connection Name and update connection properties.

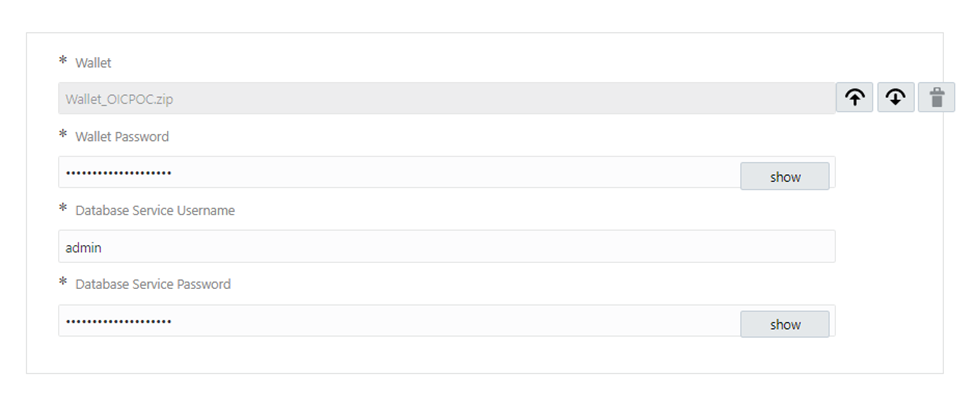
5.1 Configure Connection Properties

Note: –
- Given above details can be fetched from downloaded wallet for the ATP Instance.
- It is recommended to use the low profile as the database service name.
5.2. Configure Connection Security:- From drop down “Security Policy” select JDBC Over SSL and enter detail as follows with ADMIN password.

Note :-
- JDBC Basic Authentication: – Is useful to create and test the connection to the database without the connectivity agent if the database is present in the same private network as the Oracle Integration instance and if database and OIC is not present in same network then not recommended because of security.
- JDBC With OCI Signature: – This option is useful in case of the bulk data import operation and is only supported when using direct connectivity.
JDBC Over SSL: – The Oracle Autonomous Transaction Processing Adapter can connect through the connectivity agent when using the wallet. It can be used as a trigger connection only if the connectivity agent is used in the connection. However, all operations that you select on the Basic Info page such as Run a SQL Statement, invoke a Stored Procedure, and Perform anOperation On a table are supported when configuring the adapter to use direct connectivity (without the connectivity agent).
5.4. Once entered detail SAVE it and Test connection from the Right Top corner.

5.5. And Test

5.6 At the end click on SAVE and Close

6.. Configure an Agent Group: – Not required
- Configure an agent group for accessing the service hosted on your premises behind the fire wall.
- To configure an agent group, you must download and install the on-premises connectivity agent
Happy Learning !!!!

One thought on “Configure connection between OIC and Autonomous Database in OCI”